How (& Why) We Created Standards for Trigger-Based Sequences
The term “triggered emails” stands for messages that are sent automatically as a response to an action or event related to the user. Here are just a few examples of triggered emails (in case you forgot what they are):
- welcome emails sent after users sign up to a platform or subscribe to a newsletter;
- notifications about orders (for example, order confirmation emails, abandoned cart emails, etc.);
- emails asking the subscribers to take a survey or leave a review after a purchase;
- reactivation emails that encourage the user to perform some targeted action.
At first glance, experienced marketers should have no problems with creating trigger-based email sequences: just sketch a scheme, create the email templates — and you’re ready to send them right away. In reality, though, trigger-based sequences require a much more detailed and in-depth approach.
In this article, we’ll discuss our company’s standards for building these sequences and learn why they must be informative and non-excessive at the same time.
Why We Needed Standards for Building Trigger-Based Sequences
We’ve noticed that a lot of team members started to create trigger-based sequences chaotically, without understanding the logic of other employees’ sequences.
Each time marketers drew the trigger-based sequences (even the standard ones) from scratch and in their own way. They didn't use any common solutions that could be adapted to the client's needs in just a couple of clicks.
On top of that, a marketer might skip certain events in a sequence. As a result, when you need to set up and hand off the project, important steps might be left out.
This is exactly why we decided to create standards for trigger-based sequence templates.
Here’s what you should think about before launching triggers in a platform:
- the purpose of communication;
- the subscribers’ segment;
- the events and their variations in a sequence;
- the messages that you are going to send;
- the time of sending or delay of a message.
The next step is to create and adjust the sequence: remove excessive elements, add clarifications, and align it with other campaigns.
Different employees may use such templates in different ways. For example, managers may use them for setting up the triggers, checking and prioritizing. Designers and writers, on the other hand, may use them to understand the logic behind the communications.
The email sequence template is used at almost every stage of developing the automated email campaign:
- during the brainstorming and creating the email copy, the sequence helps to keep offers and CTAs relevant for every stage of the customer journey;
- during the setting up and testing stage, it is used to set up individual communications without messing up the main email sequence;
- when you measure the effectiveness of the marketing campaign, the template can help you analyze not the individual events but the sequence as a whole.
We have determined 3 main problems in designing the sequences:
- Different employees took different approaches to creating the sequences. At times even a CRM marketing professional couldn’t understand how a specific sequence works. And the situation was even worse for people from other departments (and clients).
- The general layout was hard to examine. Some elements blended with each other, which made the sequence look like a chaotic collection of shapes. We needed to design a convenient general layout so that the user would understand the logic behind the sequence.
- Colleagues used complex objects in Miro. Such sequences looked messy and weren’t convenient in practice.
How We Created the Standards and What We Considered in the Process
Here are several requirements that we applied to the standards for trigger-based sequences. These are suitable for both email sequences and other communication channels:
- The standards must clearly indicate the conditions under which trigger emails are sent.
- The standards must be easy to learn; otherwise, the team might spend too much time on studying them (or stop using them at all).
- A sequence created on the basis of the standards must be easy to understand for anybody.
- Both the general layout and the detailed view of the sequence must be convenient for examination.
After studying different types of trigger-based sequences and their common elements, we have defined our own set of rules:
- We got rid of complex elements and retained only the necessary base. This way, all our colleagues and clients can understand how the sequence works from the first glance.
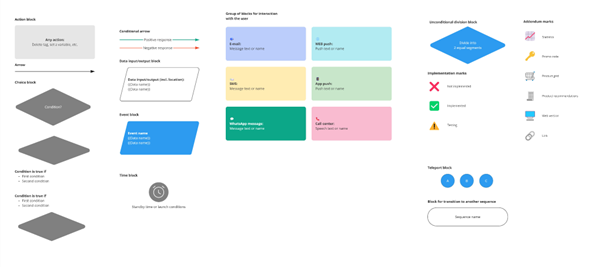
- We added our own specific blocks. In most cases, they defined actions in different communication channels.
- We included color coding. Colors allow us to examine the sequence much easier — for example, to quickly determine the communication channel.
Now we needed to draw a legend from which our colleagues could copy the objects (including additional elements, like icons for indicating the implementation stage).

After that, we needed to develop an instruction manual and communicate the new standards to all employees.
Applying Rules for the Trigger-Based Sequences in Practice
We also defined a set of rules to make trigger-based sequences more predictable:
- Use Miro to create the trigger-based sequence on a white frame.
- Before starting to work in Miro, add a frame named “Legend” that contains the list of elements. If some of the blocks are not required for the specific trigger-based sequence, delete them.
- For each sequence, indicate the description, target action, and launch conditions.
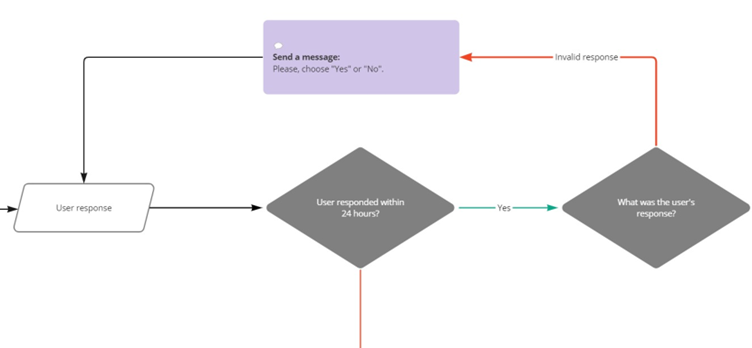
- Each block (except for the “choice” block) has 1 output. Only the “choice” blocks are responsible for decisions.
- The general direction of the sequence is left-to-right. Arrows can merge into one branch, but the lines of different branches must not intersect.
- Blocks within one branch must be located on a single line. The horizontal distance between blocks must be equal.
- If blocks are located in the same column, their width must be identical. Neighboring blocks of the same type must be of equal size.
You can work with the resulting sequence in 2 formats:
1. General layout. A full sequence is shown on the screen. This format gives an idea about how many branches the sequence has, where the “choice” blocks are located, etc.

2. Detailed view. After zooming in, you may examine individual actions and events in detail.

The Result
After releasing the standards, we waited for a while and then collected the feedback. Here’s what we’ve learned from our colleagues:
- The standards took root in projects with trigger-based sequences almost immediately.
- Employees responsible for creating the strategies said that the standards are very convenient and help to solve the tasks. But above everything, the standards helped to speed up the development of trigger-based sequences.
Try this method too if you wish to:
- optimize the processes and save the resources of your team when creating the trigger-based sequences;
- standardize the creation of a sequence to simplify the task and get the opportunity to scale the sequence.
 Photo by Jeffrey Brandjes on Unsplash

 How to resolve AdBlock issue?
 Ivan Ilin,